There are many reasons to add a water feature to your garden. Aside from being ornamental, water features can bring a sense of peace and tranquillity to a garden. Watching and listening to running water can be very therapeutic. Even the smallest water features can create a calm atmosphere. The only downside to water features is that they can be on the costly side. So, rather than forking out hundreds or even thousands of pounds for an impressive garden fountain, why not have a go at creating your own? In this article, we’ve included a basic DIY concrete fountain tutorial which can easily be adapted to suit different designs.

Designing Your Concrete Water Feature
Before buying any materials you will first need to plan out your design. Browse your local garden centre and look at pictures online for inspiration. Think about what style and size water feature will best complement your space. If you have an awkward gap to fill, a small, humble water feature may do just the trick. If you have a lot of space to play around with, you have the opportunity to be a bit more adventurous in your design. However, if this is your first time dabbling with a bit of DIY, we do recommend you stick to a relatively simple design. Once you’ve got a design idea in your head sketch it out on paper. If you’re not very talented when it comes to drawing, do not fret. This step is just to help you visualise what your completed design is going to look like.

Choosing Your Materials
There are many ways to create a water feature, but one of the easiest is to use the help of a water fountain kit. Fountain kits can range in price anywhere from £10 to £1000 plus. The price typically depends on the litre capacity of the water pump. Some kits are solar powered, whereas others will require a mains attachment. The most basic kits will usually contain some kind of submersible water pump and a spout which shoots out water. Kits at the higher end of the price range may also include additional features such as variable flow control and lighting.
You will also need a
concrete mix to create the main structure of your fountain. Various types of concrete can be used to create your water feature but we recommend using
water tight concrete. Water tight concrete or
water proof concrete is a specially designed concrete mix used for structures in constant contact with water, such as swimming pools and storage tanks. Water tight concrete will not crack, shrink or absorb a lot of water.
Aggregates are an optional feature. They can be used to fill in gaps or hide components of your water feature such as the pump or spout.
Aggregates of any size can be used in your water feature, from
large boulders to
pea gravel.
You will also need a concrete mould in your chosen shape or shapes. Concrete moulds come in hundreds of designs. Depending on your design, you may want to layer shapes on top of one another or just use one shape on its own.

Creating a spherical concrete fountain
You’ll need:
Fountain kit containing Submersible fountain pump, PVC tubing & fountain spout
Plastic pipe 10mm x 30cm
Wooden dowel 2cm x 30cm
Round, plastic fountain reservoir tray or plastic bucket approx 1m x 50cm
1.5m square galvanised steel mesh (if using plastic bucket)
Unwashed aggregates in assorted sizes – 40mm – 100mm
Garden spade
Watertight concrete
Spherical concrete mould 20cm x 20cm
Measuring tape
Step one
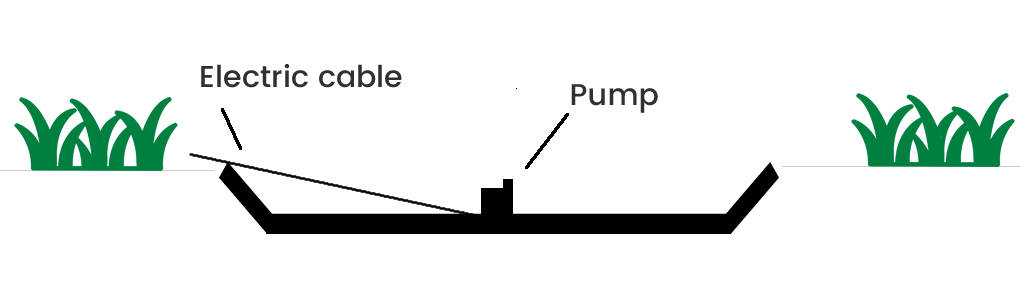
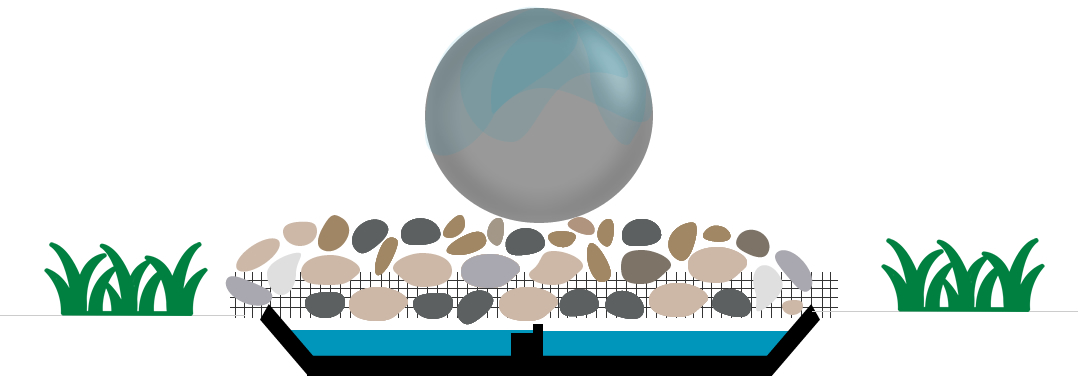
The reservoir of your fountain will be hidden underground, so you’ll need to start by digging a trench. This trench should be slightly bigger (around a cm) than the width and depth of your reservoir tray or plastic bucket. You can use a builder’s line and wooden dowels to mark this area. Alternatively, you could use washable spray paint to mark the area. Keep measuring as you dig to ensure you don’t go too deep. Once you’ve dug the hole to the correct size, set your plastic tray/bucket inside.

Step two
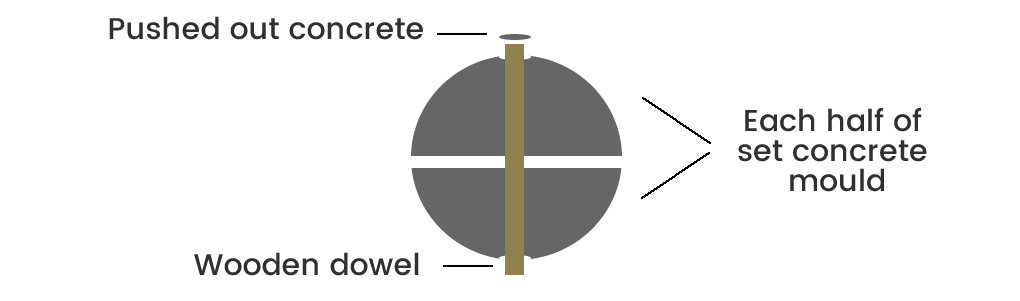
Now it’s time to make the spherical concrete ball. This is the part of your water feature that will sit above ground. Mix your waterproof concrete to the manufacturer’s instructions and fill your mould. Spherical concrete moulds usually come in two halves. Once set, each half is put together to form a sphere. You will need to create a cylinder in the centre of the sphere for the tubing to fit through. This can be done in a couple of ways but the easiest way is to use a piece of PVC piping. For this method, begin by filling each half of the mould with your mixed concrete. Once you’ve filled each mould, measure the top to find the exact centre. One you’ve found this point, push the pvc pipe through at this exact point, you need to be precise with your measurements here, otherwise each mould may not line up with one another. Make sure you have securely taped up the end of the pipe. If you miss this step, your PVC pipe will become filled with concrete and you won’t be able to feed any tubing through! Tap the mould firmly to pop any air bubbles, and wait for the concrete to set.
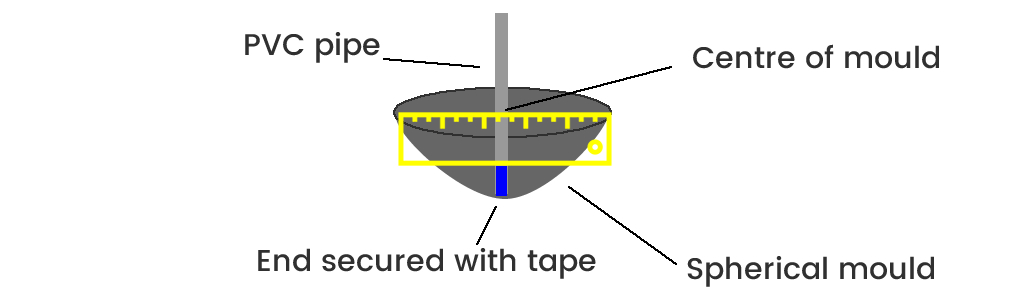
Once the concrete is set, remove each half from the mould. Once each half is removed, push a wooden dowel through the PVC pipe to make a hole in the other end of the concrete sphere. There should only be a thin layer of concrete here which will be quite easy to push through.
If you would prefer, you can skip this method and drill a hole all the way through the concrete sphere using a 1.5cm concrete drill bit.
Place one half of the sphere on top of the other, you should find that both pieces of pipe in the centre of the sphere line up. If you like, you can secure each half of the sphere together with mortar.
Now you have a completed concrete sphere, and the reservoir your fountain has been placed in the ground, you can begin to assemble your fountain.
Place the submersible pump into the centre of the reservoir tray. Trail the electric cable up and out of the tray.
Attach the plastic tubing to the appropriate section of the pump.
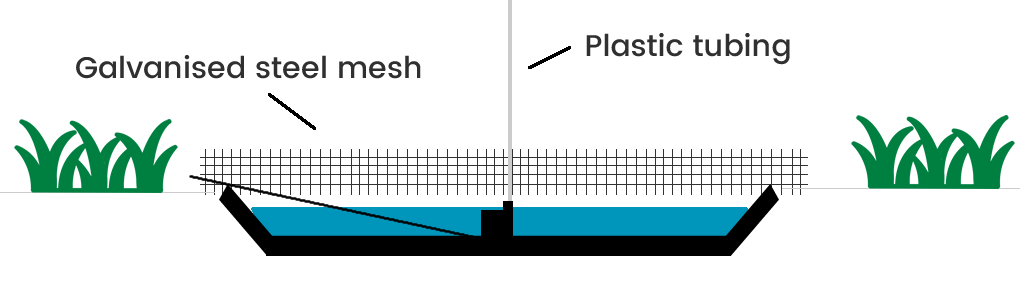
Fill the tray with water.
Place the galvanised steel mesh over the tray and feed the plastic tubing and cable through the mesh. The mesh should slightly protrude the perimeter of the tray.
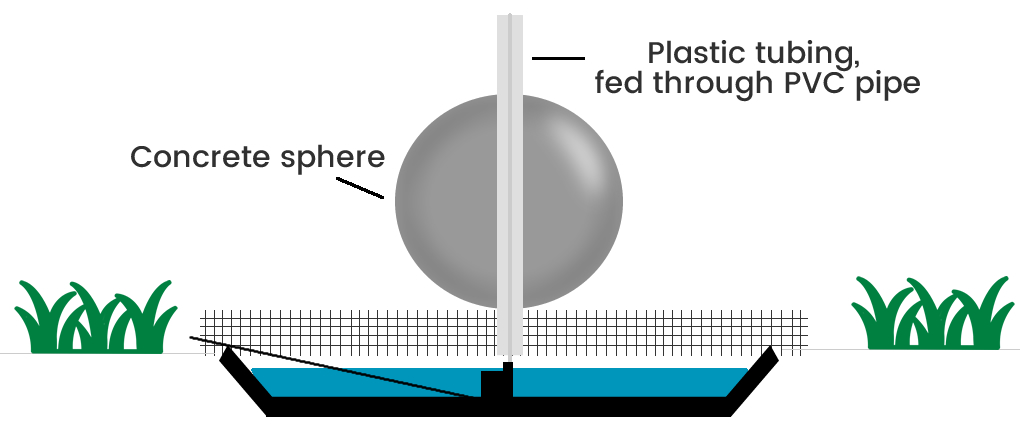
Place the concrete sphere in the centre of the mesh and feed the plastic tube through its centre.
Begin to cover the mesh surrounding the sphere with your aggregate assortment. Start by using larger rocks and to fill the space and use smaller aggregates to fill in any gaps.
Use a hacksaw to cut excess PVC pipe and tubing that may be protruding from the concrete sphere.
Turn on the pump and enjoy your new, homemade fountain!